

Children love to color their own Easter eggs. So do adults! If you are looking for an inter-generational activity that is fun and connecting, this is it. I tested this out last year by having this as an activity for my Easter guests who were all of all ages. It was a hit. With all ages “getting into it”, including the males in the family, even Grandpa seemed to enjoy the coloring of eggs and intricate design work. See the picture above of our finished eggs. Our eggs were placed on a 3 tier wire cupcake holder lined with lettuce and a few sprinkles of grated carrots for an Easter look and a way to keep the eggs from rolling around too much.
What is even more fun is to use natural plant-based dyes made from food you have in your kitchen. We are talking red cabbage, beets, onions, coffee, frozen blueberries, etc. This is a bit of an art / science experiment that everyone can get into. This is sort of old, old school. Not only no plastic eggs, but dyes that are good for you and the environment that were used before artificial dyes were on the market. I am listing some of the foods that can create dyes for your Easter eggs. For natural egg dye recipes and instructions for your Easter eggs go to: http://www.marthastewart.com/267850/dyeing-eggs-naturally . You may also consider checking out the following blog piece: www.yourhomebasedmom.com/naturally-dyed-easter-eggs/ She has a smaller recipe with a bit less time involvement with examples of using these dyes with children.
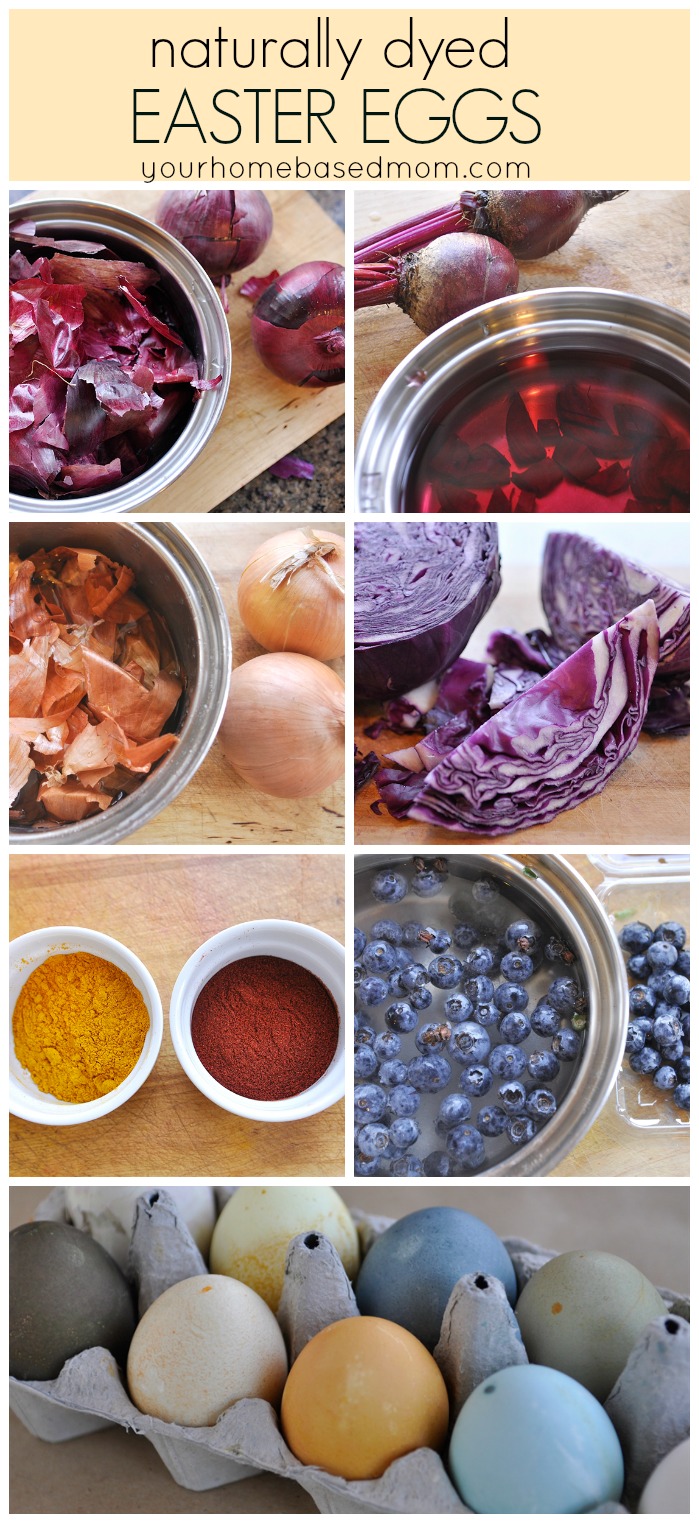
Red cabbage creates blue.
Brewed coffee or tea creates brown.
Blueberries will create a blue-gray.
Beets will create a pink.
Onions with yellow skins will create a yellow. And purple onion skins will give you purple.
Tumeric can also create a yellow. (Tumeric is a spice.)
Paprika will create a muted red / orange.
Making the Dye as Part of Your Easter Event.
If you have the space or a smaller group, you can let folks help make the plant-based dyes. This will involve some time, so this would be something to consider as to including this piece in your Easter event. The younger your children, the more challenging it will be, due to that most of the dyes need to be cooked on the stove. Some dyes are more simple to prepare than others. So finding ones that are easy and not a long process may work best. Each person can be in charge of a certain color or colors. Your children will think this is so cool and it is! What fun to see the dyes you can create and then how your eggs will absorb and create color on the eggs.
A few General Tips:
- The longer an egg sets in a natural dye the more intense the color. For a super intense look you can even do a soak overnight in the refrigerator.
- The white egg will give you a more clear color. Brown eggs will give you a more muted, antique soft look.
- With natural dyes you will want to keep stirring the egg to keep the dye even on the egg.
- There are cold water dyes that can be created. These will be bit more muted unless you soak for a longer period of time. And then for more intense colors boiling the plant-based item with or without the eggs is suggested by some.
- It appears that vinegar is a setting agent for many recipes. And some suggest salt as helpful.
- Be prepared for a bit of a mess. No biggie, For little ones (or for big ones who are concerned) you can cover up with aprons or old shirts. Having a base to work from on the table can help. A plate with a paper towel placed on top to set your egg on is helpful. And yes your hands may get a bit of dye on them. But most will wash off with soap and water and the rest wears off pretty quickly. One idea would be to buy some disposable rubber gloves to keep hands clean if this is a real concern. Spoons to stir your eggs help. A pretty plastic table-cloth is good for clean up. Tongs might be helpful too for removing eggs from the dye pots. But spoons will work.
- The egg carton can be place to let eggs dry out, the cardboard ones are most useful. Some folks use a wire rack to let eggs dry out.
- If your group is particularly adventuresome, you can have some empty cups or small bowls for folks to mix colors for their own unique blend.

Very Simple Ways to Create or Decorate Your Eggs:
- Two toned eggs can be created by dipping only one portion on one end and then switching to the other side of the egg.
- Using crayons to draw something on the egg and then dipping the egg in the dye. This is a crayon resist technique.
- A sponge can be used to create a certain look.
- Thin lined permanent markers work nicely after the egg has been dyed and dried. Or they can be used on a white or brown un-dyed egg.
- Rubber bands are fun to use as a way to keep a certain parts of the egg covered and un-dyed. For a striped look possibly.
- Using very small soft leafs can work well to make a leaf print. I have used cilantro and parsley. A piece of panty hose can be tied around the egg and plant to keep it in place during the dyeing process.
- Glitter pens can be used after you egg is dyed or for that matter on an un-dyed egg.
- For a shiny look after your egg is dyed and dry, you can rub it down with a bit of vegetable oil.
Best wishes in creating YOUR own, unique egg dyeing activity for your family!

Reblogged this on Children Are Our Future Now!.
LikeLike
Thanks Paulette for re-blogging my post. Best wishes for a great Easter.
LikeLiked by 1 person
It was my pleasure Tanna. You also have a blessed Easter.
LikeLike
I really enjoy hearing about natural dyes from plants. I have posted another year of this project. Beet juice makes such a lovely color and you mention all kinds of choices for this festive and lovely project. Hope you have a wonderful Easter!
LikeLike
I appreciate your comment. Thank you. Hope you have a great Easter.
LikeLike